[출처 : http://cboard.cprogramming.com/c-programming/109648-fwrite-fread-question.html]

회사 동료가 찾아준 링크에서

bigendian을 littleendian로 바꿨다.


그리고 fwrite랑 동일하게 작동하려면,

else 부분에서 반환되는 값을 size로 나눠야 한다.


static size_t littleendian_fwrite(const void* data, size_t size, size_t count, FILE* stream)

{

uint32_t i = 1;

const char* c = (char*)&i;

int32_t written = 0;

if (!(*c == 0))

return fwrite(data, size, count, stream);

else

{

c=data-1;

while(count-- > 0)

{

c+=size;

for(i=0;i<size;i++)

written+=fwrite(c--,1,1,stream);

}

return written/size;

}

}


[출처 : http://www.coolsms.co.kr/?document_srl=62073]


이번에는 파이썬에서 PHP UTF-8 한글 자르기와 같은 내용으로 다뤄보겠습니다.


PHP와 마찬가지로 완성형 한글에서 한글 2바이트, 영어 1바이트 기준으로 잘라줍니다.


- UTF-8 한글 자르기

#-*- encoding: utf-8 -*-

import re


def strcut_utf8(str, destlen, checkmb=True, tail=""):

        """

         UTF-8 Format

          0xxxxxxx = ASCII, 110xxxxx 10xxxxxx or 1110xxxx 10xxxxxx 10xxxxxx

          라틴 문자, 그리스 문자, 키릴 문자, 콥트 문자, 아르메니아 문자, 히브리 문자, 아랍 문자 는 2바이트

          BMP(Basic Mulitilingual Plane) 안에 들어 있는 것은 3바이트(한글, 일본어 포함)

        """

        slen = len(str)

        tlen = len(tail)


        if slen <= destlen:

                return str


        pattern = "[\xE0-\xFF][\x80-\xFF][\x80-\xFF]"

        count=0

        text = []

        for match in re.finditer(pattern, str):

                if len(checkmb == True and match.group(0)) > 1:

                        count = count + 2

                else:

                        count = count + 1

                if (count + tlen) > destlen:

                        return "".join(text) + tail

                text.append(match.group(0))


        return "".join(text)


다음과 같이 5바이트를 잘라야하는데 완성형 한글 기준으로 봤을 때 5바이트 시작은 한글 '다'의 앞쪽 코드이기 때문에 한글이 깨어지지 않도록 4바이트까지만 잘라서 "가나" 문자열을 리턴합니다.


    print strcut_utf8("가나다라마바사아자차카타파하", 5, True, "")

    가나


아래와 같이 strlen 함수도 가능합니다.


- 완성형 한글 기준 크기 알아내기

#-*- encoding: utf-8 -*-

import re


def strlen_utf8(str):

        """

         UTF-8 Format

          0xxxxxxx = ASCII, 110xxxxx 10xxxxxx or 1110xxxx 10xxxxxx 10xxxxxx

          라틴 문자, 그리스 문자, 키릴 문자, 콥트 문자, 아르메니아 문자, 히브리 문자, 아랍 문자 는 2바이트

          BMP(Basic Mulitilingual Plane) 안에 들어 있는 것은 3바이트(한글, 일본어 포함)

        """

        pattern = "[\xE0-\xFF][\x80-\xFF][\x80-\xFF]"

        count=0

        for match in re.finditer(pattern, str):

                count = count + 1

        return count


[출처 : http://www.saltycrane.com/blog/2008/01/saving-python-dict-to-file-using-pickle/]


Here is an example using pickle which writes a Python dict to a file and reads it back again:
import pickle

# write python dict to a file
mydict = {'a': 1, 'b': 2, 'c': 3}
output = open('myfile.pkl', 'wb')
pickle.dump(mydict, output)
output.close()

# read python dict back from the file
pkl_file = open('myfile.pkl', 'rb')
mydict2 = pickle.load(pkl_file)
pkl_file.close()

print mydict
print mydict2

Results:
{'a': 1, 'c': 3, 'b': 2}


Maybe you want something like this?

import pickle

# write python dict to a file
mydict = {'a': 1, 'b': 2, 'c': 3}
output = open('myfile.pkl', 'wb')
pickle.dump(mydict, output)
output.close()
print mydict

# read python dict back from the file
pkl_file = open('myfile.pkl', 'rb')
mydict = pickle.load(pkl_file)
pkl_file.close()
print mydict

# update dict and write to the file again
mydict.update({'d': 4})
output = open('myfile.pkl', 'wb')
pickle.dump(mydict, output)
output.close()

# read python dict back from the file
pkl_file = open('myfile.pkl', 'rb')
mydict = pickle.load(pkl_file)
pkl_file.close()
print mydict

Results:

{'a': 1, 'c': 3, 'b': 2}
{'a': 1, 'c': 3, 'b': 2, 'd': 4}


[출처 : http://shinygirl33.tistory.com/27]


 1.strip([charset])
 - 문자열 양끝제거. charset 지정이 없으면 공백문자를 제거. 지정되어 있으면 chars의 모든 조합을 제거

>>> "\t python \t".strip()
'python'
>>> ">>> python is good <<<".strip('<> ')
'python is good'

2. lstrip([chars])

 - 문자열 왼쪽 제거. chars지정이 없으면 공백문자를 제거. 지정되어 있으면 chars의 모든 조합을 제거

>>> "\t\n python".lstrip()
'python'
>>> ">>> python is good".lstrip('>')
' python is good'

3. rstrip([chars])

 - 문자열 오른쪽 제거. chars지정이 없으면 공백문자를 제거. 지정되어 있으면 chars의 모든 조합을 제거

>>> ">>> python is good <<<".rstrip('>< ')
'>>> python is good'

[출처 : http://shinygirl33.tistory.com/22]


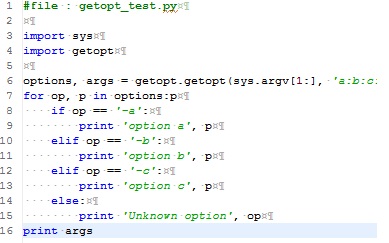
[명령행 옵션 처리]
getopt 모듈의 getopt 함수를 이용하면 sys.argv 로 전달받은 명령행의 인수 리스트에서 옵션을 불리해낸다.
옵션 인수는 -로 시작한다.

getopt 함수는 두개의 인수를 받는데, 첫 번째는 인수리스트(sys.argv[1:])이고, 두 번째는 옵션 문자들이다.
옵션 문자에 :가 사용된다면 옵션에 추가의 인수를 받아들인다는 의미이다.
즉, 'abc:d'에서 a,b는 단독 옵션이고 c,d는 인수를 갖는 옵션이다.

[예제]

사용자 삽입 이미지


[결과]


사용자 삽입 이미지
 
[출처 : http://www.imp17.com/tc/myevan/307?category=10]


관련글:
http://python.kr/viewtopic.php?t=26568

버튼이 리스트에 들어가게 될 경우 버튼 하나 하나에 일일이 이벤트 핸들러를 붙이는 것은 무리입니다.
더군다나 실시간으로 추가되거나 삭제될 경우에는 아예 불가능하죠.


이럴때 2.2 시절에는 lambda 로 했었는데


# vi: set sw=4 sts=4 expandtab:
buttons
= []

for button, index in zip(buttons, range(10)):
    button
.Bind(wx.EVT_BUTTON, lambda evt: self.OnClickButton(evt, index))

def OnClickButton(evt, index):
   
print index


요즘에는 내부가 전부 이터레이터식으로 변경되어서 안 되는 군요 (전부 마지막 값으로 ㄷㄷㄷ; )


# vi: set sw=4 sts=4 expandtab:
import wx
import
 copy

class TestFrame(wx.Frame):
 
 
def __init__(self, parent, title):
     
 wx
.Frame.__init__(self, parent, -1, title, pos=(0, 0), size=(320, 240))
 
     
self.CentreOnScreen(wx.BOTH)

        vsizer =
wx
.BoxSizer(wx.VERTICAL)
       for i in range(5):
             button =
wx
.Button(self, -1, "test%d" % i)
              button.Bind(wx.EVT_BUTTON,
self.OnClickButton)
            vsizer.Add(button)
     self.SetSizer(vsizer)


def OnClickButton(self, evt):
       print
evt
.GetEventObject().GetLabel() # POINT!!

class
 
TestApp(wx.App):
   def OnInit(self):
     
 
"OnInit"
       frame = TestFrame(None, "TestApp")
 
      frame
.Show()
       self.SetTopWindow(frame)
 
     
return True

    def OnExit(self):
 
     
"OnExit"
       pass

TestApp(redirect=False).MainLoop()


wxEvent::GetEventObject() 로 해결 하는 것이 가장 아름다운 것 같내요 : )
[출처 : http://www.imp17.com/tc/myevan/301?category=10]


트리 컨트롤은 디렉토리 구조를 표현할때 편리합니다.

사용자 삽입 이미지


그런데 경로를 파싱해서 디렉토리를 만드는건 의외로 귀찮은 일이더라구요 = =)~

그래서 만들어본 예제입니다


# vi: set sw=4 sts=4 expandtab:
import wx
import os

class wxPathTreeCtrl(wx.TreeCtrl):
   def __init__(self, *args, **kwargs):
       wx.TreeCtrl.__init__(self, *args, **kwargs)

    def InitRoot(self, rootPath):
       self.branchd = {}
       self.DeleteAllItems()
       self.root = self.AddRoot(rootPath)
       self.SetPyData(self.root, ("ROOT", rootPath))
       return self.root

    def AppendPath(self, path):
       branch = path

        branches = []
       while branch:
           branch, leaf = os.path.split(branch)
           if branch in self.branchd:
               break
           elif branch:
               branches.append(branch)

        branches.reverse()

        last = self.branchd.get(branch, self.root)
       for branch in branches:
           last = self.AppendItem(last, os.path.split(branch)[1])
           self.SetPyData(last, ("DIR", branch))
           self.branchd[branch] = last

       
        item = self.AppendItem(last, os.path.split(path)[1])
       self.SetPyData(item, ("FILE", path))
       return item

    def ExpandAllDirs(self):
       self.ExpandDirs(self.root)

    def ExpandDirs(self, node):
       if self.GetPyData(node)[0] == "FILE":
           pass
       else:
           children = list(self.GenChildren(node))
           fileCount = len([child for child in children if self.GetPyData(child)[0] == "FILE"])
           if 0 == fileCount:
               self.Expand(node)

                for child in children:
                   self.ExpandDirs(child)

    def GetBranchd(self):
       return self.branchd

    def GenChildren(self, node):
       child = self.GetFirstChild(node)[0]
       while child:
           yield child
           child = self.GetNextSibling(child)

if __name__ == "__main__":

    class TestFrame(wx.Frame):
       def __init__(self, parent, title, size=(800, 600)):
           wx.Frame.__init__(self, parent, -1, title, pos=(0, 0), size=size)
           self.CentreOnScreen(wx.BOTH)

            self.pathTreeCtrl = wxPathTreeCtrl(self)
           self.pathTreeCtrl.InitRoot("root")
           self.pathTreeCtrl.AppendPath("bin/main.exe")
           self.pathTreeCtrl.AppendPath("data/char/pc/warrior/warriror.png")
           self.pathTreeCtrl.AppendPath("data/char/pc/warrior/warriror2.png")
           self.pathTreeCtrl.ExpandAllDirs()

    class TestApp(wx.App):
       def OnInit(self):
           toolFrame = TestFrame(None, "TEST")
           toolFrame.Show()
           self.SetTopWindow(toolFrame)
           
           return True

    TestApp(redirect=False).MainLoop()
+ Recent posts