[출처 : http://withrobot.tistory.com/145]


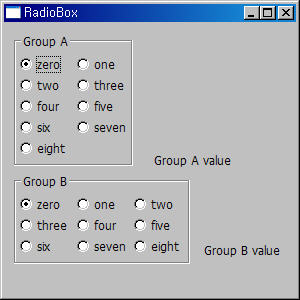
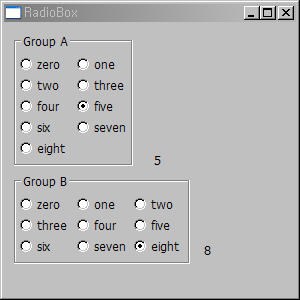
자, 이제 라디오 버튼 그룹(RadioBox)를 클릭했을 때 발생하는 이벤트(EVT_RADIOBOX)를 이용해 보자. 다른 경우와 마찬가지로 이벤트가 발생했을 때 실행할 메소드 함수를 Bind()로 연결해 주면 된다. 라디오 박스로 두 그룹의 라디오 버튼들을 생성하고, 각각 그룹별로 클릭할 때 마다 그룹 박스 옆에 선택한 라디오 버튼 번호를 출력하도록 프로그램을 작성해 보자.

사용자 삽입 이미지

#!/usr/bin/env python

"""11-2b RadioBox EVT_RADIOBOX"""

# http://withrobot.tistory.com
# 2007.12.04

import wx

class Frame(wx.Frame):
    def __init__(self, parent=None, id=-1, title='RadioBox'):
        wx.Frame.__init__(self, parent, id, title, size=(300,300), pos=(100,100) )
        panel = wx.Panel(self)

        sampleList = ['zero', 'one', 'two', 'three', 'four', 'five',
                      'six', 'seven', 'eight']
        self.rb1 = wx.RadioBox(panel, -1, "Group A", (10,10), wx.DefaultSize,sampleList,2,wx.RA_SPECIFY_COLS)
        self.rb2 = wx.RadioBox(panel, -1, "Group B", (10,150), wx.DefaultSize,sampleList,3,wx.RA_SPECIFY_COLS)

        self.Bind(wx.EVT_RADIOBOX, self.OnEvtRadioBoxA, self.rb1)
        self.st1 = wx.StaticText(panel, -1,"Group A value",(150,130))

        self.Bind(wx.EVT_RADIOBOX, self.OnEvtRadioBoxB, self.rb2)
        self.st2 = wx.StaticText(panel, -1,"Group B value",(200,220))
        
    def OnEvtRadioBoxA(self, event):
        self.st1.SetLabel(str(self.rb1.GetSelection()))

    def OnEvtRadioBoxB(self, event):
        self.st2.SetLabel(str(self.rb2.GetSelection()))        

class App(wx.App):
    def OnInit(self):
        self.frame = Frame()
        self.frame.Show()
        return True

def main():
    app = App()
    app.MainLoop()

if __name__ == '__main__':
    main()

사용자 삽입 이미지

[출처 : http://withrobot.tistory.com/144]


앞서 소개한 방법은 라디오버튼을 만들고, 그리드 컨트롤을 사용하여 라디오 버튼을 배치하고 이를 다시 StaticBox로 감싸서 배치해야 하는 번거로움이 있었다. wxPython에서는 이와 같은 과정을 하나의 함수로 간단하게 설정할 수 있는 컨트롤을 추가로 제공하는데 이것이 바로 RadioBox() 이다.

RadioBox()를 사용하면 다음과 같이 소스가 매우 간결해 진다.

사용자 삽입 이미지

RadioBox를 이용하여 두 개의 라디오 버튼 그룹 생성


#!/usr/bin/env python

"""11-2 RadioBox """

# http://withrobot.tistory.com
# 2007.12.04

import wx

class Frame(wx.Frame):
    def __init__(self, parent=None, id=-1, title='RadioBox'):
        wx.Frame.__init__(self, parent, id, title, size=(300,300), pos=(100,100) )
        panel = wx.Panel(self)

        sampleList = ['zero', 'one', 'two', 'three', 'four', 'five',
                      'six', 'seven', 'eight']
        wx.RadioBox(panel, -1, "Group A", (10,10), wx.DefaultSize,sampleList,2,wx.RA_SPECIFY_COLS)
        wx.RadioBox(panel, -1, "", (10,150), wx.DefaultSize,sampleList,3,wx.RA_SPECIFY_COLS)        
         
class App(wx.App):
    def OnInit(self):
        self.frame = Frame()
        self.frame.Show()
        return True

def main():
    app = App()
    app.MainLoop()

if __name__ == '__main__':
    main()
[출처 : http://withrobot.tistory.com/143]


라디오 버튼은 일반적으로 그룹 단위로 배치되기 마련이다. 그룹으로 묶어서 배치하려면 grid를 이용해 나열하고, 이를 하나의 박스로 묶어서 출력해야 한다. 나름대로 꽤 복잡해 진다.
사용자 삽입 이미지

#!/usr/bin/env python

"""11-1b. RadioButton """

# http://withrobot.tistory.com
# 2007.11.27

import wx

class Frame(wx.Frame):
    def __init__(self, parent=None, id=-1, title='RadioButton'):
        wx.Frame.__init__(self, parent, id, title, size=(300,300), pos=(100,100) )
        #wx.Panel.__init__(self, parent, -1)
        panel = wx.Panel(self)

        #layout controls
        vs = wx.BoxSizer(wx.VERTICAL)   #수직으로 나열
        box1_title = wx.StaticBox(panel,-1,"그룹 1")  #그룹 타이틀, 테두리 지정
        box1 = wx.StaticBoxSizer(box1_title,wx.VERTICAL) #테두리 설정
        grid1 = wx.FlexGridSizer(0,1,0,0) #가로,세로, 간격 지정
        
        radio1 = wx.RadioButton(panel,-1,"라디오1",style=wx.RB_GROUP)
        radio2 = wx.RadioButton(panel,-1,"라디오2")
        radio3 = wx.RadioButton(panel,-1,"라디오3")

        grid1.Add(radio1,0,wx.ALIGN_CENTRE, 5)
        grid1.Add(radio2,0,wx.ALIGN_CENTRE, 5)
        grid1.Add(radio3,0,wx.ALIGN_CENTRE, 5)
        
        box1.Add(grid1,0,wx.ALIGN_CENTRE|wx.ALL,5)
        vs.Add(box1, 0, wx.ALL, 5)

        panel.SetSizer(vs)
        vs.Fit(panel)
        
        
class App(wx.App):
    def OnInit(self):
        self.frame = Frame()
        self.frame.Show()
        return True

def main():
    app = App()
    app.MainLoop()

if __name__ == '__main__':
    main()

자, 여기서 FlexGridSizer 값을 변경 시키면 배열을 원하는대로 할 수 있다.
버튼을 가로로 나열해 보자. 

grid1 = wx.FlexGridSizer(1,0,0,0) #가로,세로, 간격 지정

사용자 삽입 이미지

간격값을 증가시키면 라디오 버튼간의 간격도 조절할 수 있다.
grid1 = wx.FlexGridSizer(0,1,15,0) #가로,세로, 간격 지정

사용자 삽입 이미지

[출처 : http://withrobot.tistory.com/137]


슬라이더를 움직여 값을 설정하면 어떤 동작을 취하고 싶을 때가 있다. 이 때는 EVT_SCROLL_CHANGED 이벤트를 사용하면 된다.

아래 예제는 슬라이더 옆에 StaticText()를 이용해 숫자를 출력하고, 슬라이더를 움직여 설정했을 때 OnDisplayValue() 함수를 실행시켜 설정된 값으로 출력값을 갱신하도록 만들었다. 이 구조를 이용하면 슬라이더를 이용하여 특정 값을 설정했을 때 필요한 작업을 수행할 수 있도록 프로그램을 작성할 수 있을 것이다.
사용자 삽입 이미지

EVT_SCROLL_CHANGED 설정


#!/usr/bin/env python

"""10-3. Slider, EVT_SCROLL_CHANGED 이벤트 사용 """

# http://withrobot.tistory.com
# 2007.11.26

import wx

class Frame(wx.Frame):
    def __init__(self, parent=None, id=-1, title='Slider'):
        wx.Frame.__init__(self, parent, id, title, size=(300,300), pos=(100,100) )
        panel = wx.Panel(self)

        self.mySlider = wx.Slider(panel,100,25,1,100,pos=(20,10),size=(250,-1),style=wx.SL_HORIZONTAL|wx.SL_AUTOTICKS |wx.SL_LABELS)
        self.mySlider.SetTickFreq(10,1)
        self.myValue = wx.StaticText(panel, -1, str(self.mySlider.GetValue()),pos=(0,30))
        self.Bind(wx.EVT_SCROLL_CHANGED, self.OnDisplayValue)

    def OnDisplayValue(self, event):
        self.myValue.SetLabel(str(self.mySlider.GetValue()))
        
class App(wx.App):
    def OnInit(self):
        self.frame = Frame()
        self.frame.Show()
        return True

def main():
    app = App()
    app.MainLoop()

if __name__ == '__main__':
    main()


위 예제에서 비슷한 이벤트 메시지로 EVT_SCROLL_THUMBRELEASE가 있다. 이는 슬라이더의 조정 버튼(thumb)에서 마우스 버튼을 뗄 때 발생하는 이벤트로 기능적으로는 EVT_SCROLL_CHANGED와 같다. 하지만 슬라이더를 마우스가 아니라 키보드로도 조절할 수 있는데, EVT_SCROLL_THUMBRELEASE 를 사용하면 슬라이더 설정값은 바뀌어도 이벤트는 발생하지 않게 된다. 필요에 따라 이 두 이벤트를 적절히 선택하여 사용한다.
[출처 : http://withrobot.tistory.com/136]


앞선 예제에서는 슬라이더의 눈금(tick)이 너무 조밀하게 나와서 별로 예쁘지가 않다. 원하는 간격으로 눈금을 출력하려면 SetTickFreq()를 사용한다. 

입력 파라미터는 두 개인데, 첫 번째 것은 간격이고, 두 번째 것은 사용하지 않는 파라미터로 1을 넣으면 된다.

사용자 삽입 이미지

SetTickFreq(10,1) 설정

#!/usr/bin/env python

"""10-2. Slider, tick frequency 설정 """

# http://withrobot.tistory.com
# 2007.11.26

import wx

class Frame(wx.Frame):
    def __init__(self, parent=None, id=-1, title='Slider'):
        wx.Frame.__init__(self, parent, id, title, size=(300,300), pos=(100,100) )
        panel = wx.Panel(self)

        mySlider = wx.Slider(panel,100,25,1,100,pos=(10,10),size=(250,-1),style=wx.SL_HORIZONTAL|wx.SL_AUTOTICKS |wx.SL_LABELS)
        mySlider.SetTickFreq(10,1)
        
class App(wx.App):
    def OnInit(self):
        self.frame = Frame()
        self.frame.Show()
        return True

def main():
    app = App()
    app.MainLoop()

if __name__ == '__main__':
    main()
[출처 : http://withrobot.tistory.com/135]


슬라이더(Slider)는 특정 숫자를 입력하려고 할 때 텍스트 기반으로 입력받지 않고 GUI 형태로 받을 때 유용하다. wxPython에서는 wx.Slider() 함수로 제공된다.

Slider API reference: http://www.wxpython.org/docs/api/wx.Slider-class.html

슬라이더는 입력 파라미터가 무척 많다. 하나씩 살펴보자.
Create(selfparentid=-1value=0minValue=0maxValue=100pos=DefaultPosition,size=DefaultSizestyle=SL_HORIZONTALvalidator=DefaultValidator,name=SliderNameStr) 

value는 슬라이더를 처음 표시할때 시작할 값이다.
min과 max는 슬라이더의 최소치와 최대치 값을 지정하는 것이고, pos, size 역시 포인트 단위로 프레임에서 위치 및 크기를 지정하는 용도의 파라미터이다.

가장 중요한 부분이 style 파라미터인데, 이 인자을 어떻게 설정하느냐에 따라서 다양한 슬라이더를 만들어 낼 수 있다. 들어갈 수 있는 인자를 정리해 보자.

wx.SL_HORIZONTAL: 수평 슬라이더
wx.SL_VERTICAL: 수직 슬라이더
wx.SL_AUTOTICKS: 슬라이더에 눈금 표시
wx.SL_LABELS : 슬라이더 눈금 위에 숫자 표시
wx.SL_LEFT: vertical 슬라이더에서 눈금을 슬라이더 왼쪽에 표시
wx.SL_RIGHT: vertical 슬라이더에서 눈금을 슬라이더 오른쪽에 표시
wx.SL_TOP: horizontal 슬라이더에서 눈금을 슬라이더 윗쪽에 표시

우선 가장 간단한 SL_HORIZONTAL 스타일만 적용하여 슬라이더를 하나 만들자.
사용자 삽입 이미지

Horizontal slider

#!/usr/bin/env python

"""10-1. Slider """

# http://withrobot.tistory.com
# 2007.11.26

import wx

class Frame(wx.Frame):
    def __init__(self, parent=None, id=-1, title='Slider'):
        wx.Frame.__init__(self, parent, id, title, size=(300,300), pos=(100,100) )
        panel = wx.Panel(self)

        mySlider = wx.Slider(panel,100,25,1,100,pos=(10,10),size=(250,-1),style=wx.SL_HORIZONTAL)
        
class App(wx.App):
    def OnInit(self):
        self.frame = Frame()
        self.frame.Show()
        return True

def main():
    app = App()
    app.MainLoop()

if __name__ == '__main__':
    main()


자, 위 슬라이더에 스타일을 적용해 보자
사용자 삽입 이미지

AUTOTICK과 LABELS 스타일을 적용


        mySlider = wx.Slider(panel,100,25,1,100,pos=(10,10),size=(250,-1),style=wx.SL_HORIZONTAL|wx.SL_AUTOTICKS |wx.SL_LABELS)
[출처 : http://www.python-forum.org/pythonforum/viewtopic.php?f=2&t=10224]


# create a wx.MemoryDC canvas on top of a blank bitmap
# you can then save the canvas drawings to a standard image file
# source: Dietrich   25nov2008  

import wx
import random

class MyFrame(wx.Frame):
    def __init__(self, parent, mytitle, mysize):
        wx.Frame.__init__(self, parent, wx.ID_ANY, mytitle, size=mysize)
        self.show_bmp = wx.StaticBitmap(self)
        self.draw_image()
        self.save_image()

    def draw_image(self):
        # get the width and height for the blank bitmap
        w, h = self.GetClientSize()
        # create the blank bitmap as a drawing background
        draw_bmp = wx.EmptyBitmap(w, h)
        # create the canvas on top of the draw_bmp
        canvas = wx.MemoryDC(draw_bmp)
        # fill the canvas white
        #canvas.SetBrush(wx.Brush('white'))
        #canvas.Clear()
        
        # pen colour, default is black
        #canvas.SetPen(wx.Pen('red', 1))
        
        # draw a bunch of random circles ...
        bunch = 100
        for k in range(bunch):
            # fill colour
            r = random.randint(0, 255)
            g = random.randint(0, 255)
            b = random.randint(0, 255)
            colour = wx.Colour(r, g, b)
            canvas.SetBrush(wx.Brush(colour))
            x = random.randint(0, w)
            y = random.randint(0, h)
            r = random.randint(10, w/4)
            canvas.DrawCircle(x, y, r)

        # put the canvas drawing into the static bitmap to display it
        # (remember the canvas is on top of a draw_bmp empty bitmap)
        self.show_bmp.SetBitmap(draw_bmp)

    def save_image(self):
        """save the drawing"""
        # get the image object
        circles_image = self.show_bmp.GetBitmap()
        circles_image.SaveFile("mycircles.jpg", wx.BITMAP_TYPE_JPEG)


app = wx.App(0)
mytitle = 'draw random circles and save image'
width = 420
height = 400
MyFrame(None, mytitle, (width, height)).Show()
app.MainLoop()


Circles1.jpg
[출처 : http://www.daniweb.com/code/snippet216704.html]


# experiment with wxPython's
# wx.media.MediaCtrl(parent, id, pos, size, style, backend)
# the backend (szBackend) is usually figured by the control
# wxMEDIABACKEND_DIRECTSHOW   Windows
# wxMEDIABACKEND_QUICKTIME    Mac OS X
# wxMEDIABACKEND_GSTREAMER    Linux (?)
# plays files with extension .mid .mp3 .wav .au .avi .mpg
# tested with Python24 and wxPython26 on Windows XP   vegaseat  10mar2006

import wx
import wx.media
import os

class Panel1(wx.Panel):
    def __init__(self, parent, id):
        #self.log = log
        wx.Panel.__init__(self, parent, -1, style=wx.TAB_TRAVERSAL|wx.CLIP_CHILDREN)

        # Create some controls
        try:
            self.mc = wx.media.MediaCtrl(self, style=wx.SIMPLE_BORDER)
        except NotImplementedError:
            self.Destroy()
            raise

        loadButton = wx.Button(self, -1, "Load File")
        self.Bind(wx.EVT_BUTTON, self.onLoadFile, loadButton)
        
        playButton = wx.Button(self, -1, "Play")
        self.Bind(wx.EVT_BUTTON, self.onPlay, playButton)
        
        pauseButton = wx.Button(self, -1, "Pause")
        self.Bind(wx.EVT_BUTTON, self.onPause, pauseButton)
        
        stopButton = wx.Button(self, -1, "Stop")
        self.Bind(wx.EVT_BUTTON, self.onStop, stopButton)

        slider = wx.Slider(self, -1, 0, 0, 0, size=wx.Size(300, -1))
        self.slider = slider
        self.Bind(wx.EVT_SLIDER, self.onSeek, slider)
        
        self.st_file = wx.StaticText(self, -1, ".mid .mp3 .wav .au .avi .mpg", size=(200,-1))
        self.st_size = wx.StaticText(self, -1, size=(100,-1))
        self.st_len  = wx.StaticText(self, -1, size=(100,-1))
        self.st_pos  = wx.StaticText(self, -1, size=(100,-1))
        
        # setup the button/label layout using a sizer
        sizer = wx.GridBagSizer(5,5)
        sizer.Add(loadButton, (1,1))
        sizer.Add(playButton, (2,1))
        sizer.Add(pauseButton, (3,1))
        sizer.Add(stopButton, (4,1))
        sizer.Add(self.st_file, (1, 2))
        sizer.Add(self.st_size, (2, 2))
        sizer.Add(self.st_len,  (3, 2))
        sizer.Add(self.st_pos,  (4, 2))
        sizer.Add(self.mc, (5,1), span=(5,1))  # for .avi .mpg video files
        self.SetSizer(sizer)

        self.timer = wx.Timer(self)
        self.Bind(wx.EVT_TIMER, self.onTimer)
        self.timer.Start(100)
        
    def onLoadFile(self, evt):
        dlg = wx.FileDialog(self, message="Choose a media file",
                            defaultDir=os.getcwd(), defaultFile="",
                            style=wx.OPEN | wx.CHANGE_DIR )
        if dlg.ShowModal() == wx.ID_OK:
            path = dlg.GetPath()
            self.doLoadFile(path)
        dlg.Destroy()
        
    def doLoadFile(self, path):
        if not self.mc.Load(path):
            wx.MessageBox("Unable to load %s: Unsupported format?" % path, "ERROR", wx.ICON_ERROR | wx.OK)
        else:
            folder, filename = os.path.split(path)
            self.st_file.SetLabel('%s' % filename)
            self.mc.SetBestFittingSize()
            self.GetSizer().Layout()
            self.slider.SetRange(0, self.mc.Length())
            self.mc.Play()
        
    def onPlay(self, evt):
        self.mc.Play()
    
    def onPause(self, evt):
        self.mc.Pause()
    
    def onStop(self, evt):
        self.mc.Stop()
    
    def onSeek(self, evt):
        offset = self.slider.GetValue()
        self.mc.Seek(offset)

    def onTimer(self, evt):
        offset = self.mc.Tell()
        self.slider.SetValue(offset)
        self.st_size.SetLabel('size: %s ms' % self.mc.Length())
        self.st_len.SetLabel('( %d seconds )' % (self.mc.Length()/1000))
        self.st_pos.SetLabel('position: %d ms' % offset)


app = wx.PySimpleApp()
# create a window/frame, no parent, -1 is default ID
frame = wx.Frame(None, -1, "play audio and video files", size = (320, 350))
# call the derived class
Panel1(frame, -1)
frame.Show(1)
app.MainLoop()

+ Recent posts